Sending Messages
Understanding SMS
SimpleSell SMS allows you to send a text message to an individual or group. Performing an SMS campaign involves sending a text message to a group.
SMS Length
A normal SMS text is 160 characters long. When a message exceeds 160 characters, it is broken down into multiple texts of 153 characters each. 7 characters per text are used in linking the SMS texts to form one messages.
Some special characters such as emojis (e.g. 😀, 👍 or 🙈) or foreign language characters like Arabic (e.g مرحبا) or Chinese (e.g. 你好), the underlying characters set is changed to support more types of symbols and as a result, each message holds fewer characters. In this format, each SMS text is a maximum of 67 characters.
There are some special characters e.g. {, }, [, ], ^, \, | and € that always use up the space of 2 characters.
SimpleSell SMS allows you to create messages that spans up to 6 SMS texts.
SMS Delivery Status
When you send a SMS text, a number of things could happen to it. SimpleSell SMS uses various indicators to show the status of a message.
- Pending. Message is queued and awaiting sending
- Sent. Message as been sent but delivery status is not yet known
- Delivered. Message has been successfully received on the recipient’s mobile handset
- Failed. Message was not received. This could be because:
- the user has opted out of receiving messages from you
- the line is temporarily out of service
- the line is not registered etc.
- Rejected. The network chose not to deliver the message
The following indicators correspond to each of the states above (each number corresponds to the state).

Delivery status indicators
Unsubscribe Notice
The first message that you send to your contacts comes with unsubscribe instructions appended in compliance with CAK regulations.
A user will be unsubscribed automatically if they follow these opt-out instructions.
The instructions may look something like this: To opt out of this free sms send STOP Marketplace to 20880.
This unsubscribe notice counts towards the characters you have in your text message and may affect the cost of an outgoing message.
How to Message an Individual
To send a message to an individual, you’ll need to locate them in your addressbook. You can do this by going through your list of contacts or using the search tool (see How to Find a Contact).
Click on envelope icon to send SMS
Once you’ve clicked on the send message (envelope) icon, you will be presented with a page on which to compose your text message.
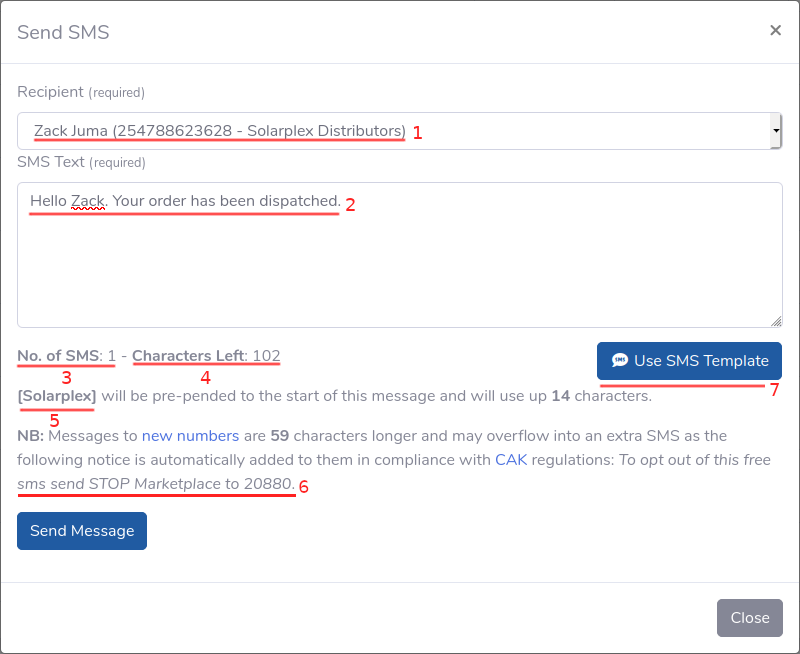
Sending an SMS text to an individual
The page has a number of important elements highlighted above. These are (as labelled):
- Recipient. This shows the name and phone number of the person who will receive the text message
- Message body. This is where you type your message
- SMS count. This is an estimate of how many SMS texts your message will require
- Characters left. These are the number of characters left before a new SMS text will be required
- Sender ID. This is how you will be identified to the recipient. If you are using a shared sender ID (see How to Create an Account), the length of this will be deducted from the total characters you have available
- Unsubscribe message. This will be appended to the message if you’ve not communicated with the recipient before. It will affect the characters you have to work with
- Use SMS Template. This makes it easier to send messages by allowing you to use pre-composed text messages. Visit SMS Templates to learn more
Once you have composed your text, click on the Send Message button. Make sure that the number of tokens you have is at least equal to the SMS count shown. If you are sending a text message to someone you’ve not contacted before, give yourself an allowance of at least 1 extra token.
Once you click the Send Message button, your message will be queued and will be sent as soon as possible (usually within 1 minute).
Important
Your message may be delayed if you already have an ongoing SMS campaign. Also, a message may be sent successfully but not be delivered immediately due to the network being busy, the recipient’s phone being off or out of network coverage etc.
How to Message a Group (SMS Campaign)
This is what performing an SMS Campaign is all about. To perform an SMS campaign, click the SMS Campaign button at the top of the screen or the Campaigns menu on the left-side menu bar (see The Dashboard with Key Elements Labelled).
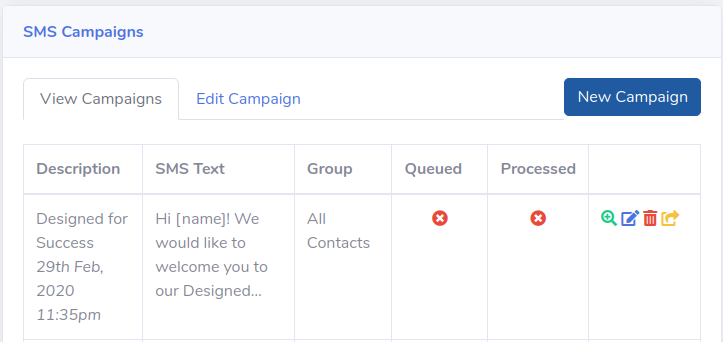
View Campaigns Page
Once you are on the campaigns page, you will see a list of completed, ongoing and pending campaigns. To start a new campaign, click on the New Campaign button.
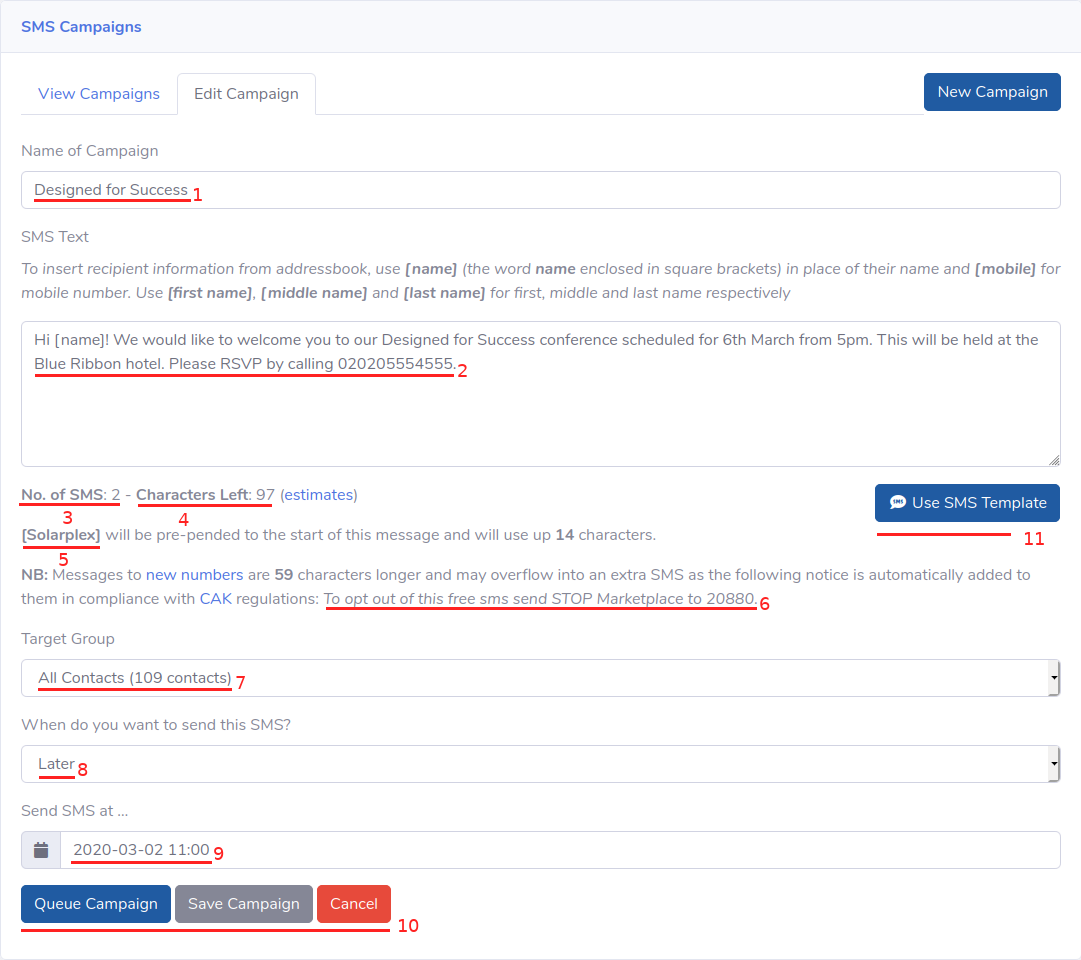
Campaign Composer Page
The campaign composer is very similar to the single SMS composer. However, there are some key differences which we will highlight as we go along.
Campaign name. This a name to identify the campaign and help you remember later what it’s purpose was. It’s for internal use only
Message body. This is where you type your message. SimpleSell SMS allows you to customise the messages sent for each user by doing things like inserting a recipient’s name by using the tag [name], e.g. if you type in [name] in the message body and the recipient’s name is Mary Muli, [name] will be replaced with Mary Muli in the final SMS. Other supported tags include:
- [mobile]: inserts the recipient’s mobile number
- [first name]: inserts the recipient’s first name
- [middle name]: inserts the recipient’s middle name
- [last name]: inserts the recipient’s last name
You can customise the outgoing SMS even more by using a spreadsheet to define more custom fields (see Using a Spreadsheet for a Campaign for details)
SMS count. This is an estimate of how many SMS texts your message will require. This is NOT the total number of texts that will be sent out for the entire SMS campaign but is an estimate of the number of texts that each recipient is expected to get
Characters left. These are the number of characters left before a new SMS text will be required
Sender ID. This is how you will be identified to the recipient. If you are using a shared sender ID (see How to Create an Account), the length of this will be deducted from the total characters you have available
Unsubscribe message. This will be appended to the message if you’ve not communicated with the recipient before. It will affect the characters you have to work with
Target group. This is the group of recipients that will receive the text message. If you wish to define the recipients using a spreadsheet, option (see Using a Spreadsheet for a Campaign for details)
When to send. You can choose between Immediately and Later. The Immediately option will allow you to send the messages as soon as you submit the form. The Later option allows you to set the date and time when you would like to have the message sent. This is useful if you want to have a message sent out at a time when you won’t be available to send it
Date and time to send. This option is only available if you select the Later option in the when to send field. You can type the date and time or select it from a date and time picker
Action buttons. The options here change depending on earlier settings. If you’ve selected the send Immediately option, the primary button will be Send Campaign. If you’ve selected send Later, the option will be Queue Campaign (to be sent on the date/time selected). The Save Campaign option allows you to save a campaign as draft for review later before sending. It is not available if you have the Custom CSV Spreadsheet option selected. Cancel discards your changes (it does not delete a campaign you had already saved and had opened up for editing)
Use SMS Template. This makes it easier to send messages by allowing you to use pre-composed text messages. Visit SMS Templates to learn more
Once you have composed your text, click on the Send/Queue Campaign button. Make sure that the number of tokens you have is at least equal to the SMS count shown multiplied by the size of the target group. If you do not have enough tokens, you will be directed to the payment page to top up.
Note that if you have people that you’ve not contacted before in your target group, you might want to give yourself an allowance of at least 1 extra token per new contact.
Important
The tags used to customise outgoing text messages are not case sensitive. [name], [Name] and [NAME] all mean exactly the same thing. The same applies when using the Custom CSV Spreadsheet option: the case of the column names does not matter.
Once an SMS campaign is completed, you can click on the Download Campaign button (highlighted below) for a detailed report indicating the delivery status and cost of each message.

Download Campaign Report
Using a Spreadsheet for a Campaign
You may want to send messages that are highly customised to each user. For example, you may be sending out bills where each recipient has a different account and amount due.
In this case, using a spreadsheet in CSV format with this information is the way to go. To use this feature, select the Custom CSV Spreadsheet option under Target group.

Upload Custom Spreadsheet
As a minimum, the spreadsheet must have a mobile column as this is will be used to determine the target recipient phone numbers of the messages. If it’s missing, processing of the campaign will fail. All phone numbers found in the mobile column that are not already in your addressbook will be added to it.
If you have the columns name, first name, middle name and last name in your spreadsheet, they will be saved alongside the mobile number in your addressbook. The contacts are added to the All Contacts group.

Custom Spreadsheet Sample
To insert information from the spreadsheet into the message, write the column name wrapped in square brackets (“[]”) in the message body. For example, if you have a column for amount due and another one for deadline, you can do something like this:
Please pay the amount of KES[amount due] by [deadline] to avoid disconnection.
If the spreadsheet columns above have the values 2999 and June 19th for a user John, John’s message will read:
Please pay the amount of KES2999 by June 19th to avoid disconnection.
Once you submit the form with the CSV file selected, the customised messages will be generated and queued.
Important
If you are using a custom CSV for your contacts, you cannot save your campaign as draft as the contacts list and messages need to be generated on the fly.
Re-using a Campaign
Every now and then, you may want to re-use an SMS campaign sent earlier with the same or a new group. To do this, go to the campaigns list page and click on the re-use this campaign button (highlighted below) to the right of the campaign in question.

Controls for Past Campaigns
The campaign composer will open with information from the old SMS campaign copied over. You can then edit and queue the new campaign.
How to View Sent Messages
You can view sent messages by clicking on the Outbox item on the navigation menu.
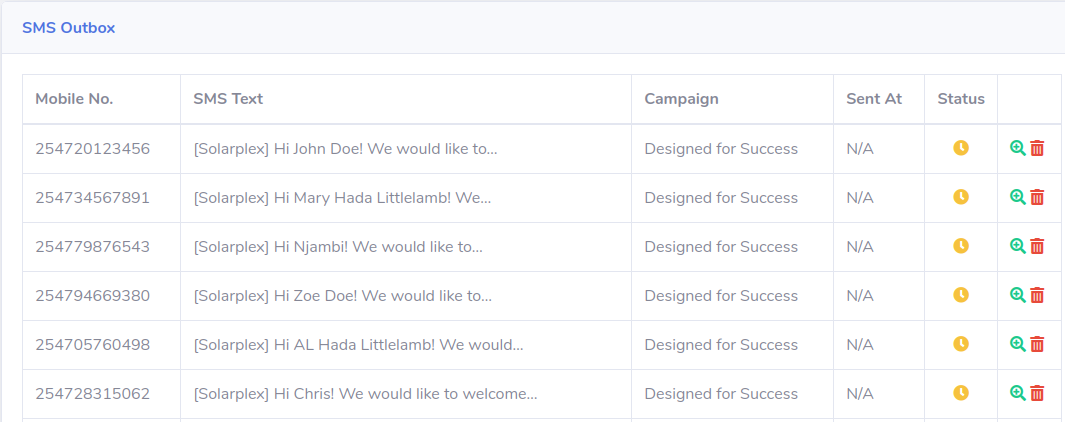
Outbox Queue
You can view detailed information about an SMS by clicking on the magnifying glass icon to the left of the SMS. This will show you detailed information about the SMS.
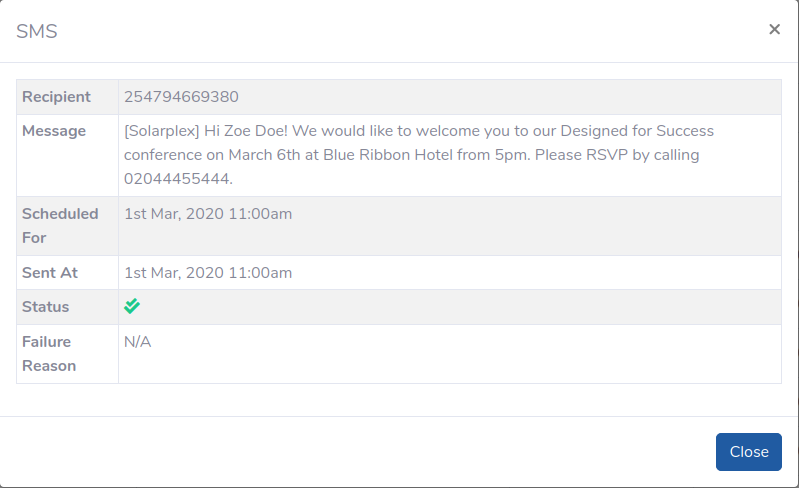
SMS Expanded View
Undelivered Messages
If a message has not been delivered, you can click on the re-send icon on the outbox queue to attempt to send it again. This option is only available if the message did not fail due to a permanent error, e.g. UserDoesNotExist. You can view the Failure Reason in the SMS Expanded View above.

Re-send SMS Option Highlighted
